Why Seal Your Pavers?
Brick pavers are a beautiful, durable choice for driveways, patios, and pool decks throughout South Florida. But without proper sealing, even the highest-quality pavers degrade over time.
Sealing does more than most people realize. Sealed pavers display richer, deeper colors — like the difference between a wet stone and a dry one, which is often dramatic on faded installations. Spills and stains (oil drips, leaf tannins, rust) stay on the surface instead of penetrating, making cleanup easy. Quality sealers lock in joint sand so weeds struggle to establish, and they prevent the joint erosion that Florida's afternoon thunderstorms accelerate over time. Sealed surfaces are also less hospitable to the algae and mold that cause black and green staining throughout Palm Beach County hardscapes.
Types of Paver Sealers
Not all sealers are created equal. These are the main types you'll encounter:
Water-Based vs. Solvent-Based Sealers
Water-based sealers have lower odor, apply more easily, and offer good UV resistance — the right choice for pool decks, patios, and enclosed spaces where ventilation is limited. They may need reapplication more often.
Solvent-based sealers penetrate deeper and last longer, with a more pronounced wet-look enhancement. The tradeoff is stronger odor during application, longer cure times, and higher VOCs. These are the standard choice for driveways and high-traffic areas.
Within each type, you'll choose between a wet look (glossy, pavers appear perpetually damp) and a natural look (matte finish, protects without changing appearance). Most Palm Beach homeowners prefer wet-look on driveways and pool decks; natural look is common on front walkways where a glossy finish would feel out of place.
Most Palm Beach homeowners prefer wet-look sealers for their dramatic color enhancement, but natural-look options work well for those wanting subtle protection.
The Professional Sealing Process
When you hire professionals like Crouching Tiger, the process looks like this:
Step 1: Thorough Cleaning
Before any sealer is applied, pavers must be completely clean. We pressure wash the entire surface to remove:- Dirt and debris
- Algae and mold
- Old, failing sealer
- Stains and discoloration
Step 2: Weed Removal and Joint Repair
We remove any weeds growing between pavers and assess the condition of joint sand. If joints are eroded or empty, we add fresh polymeric sand before sealing.Step 3: Drying Time
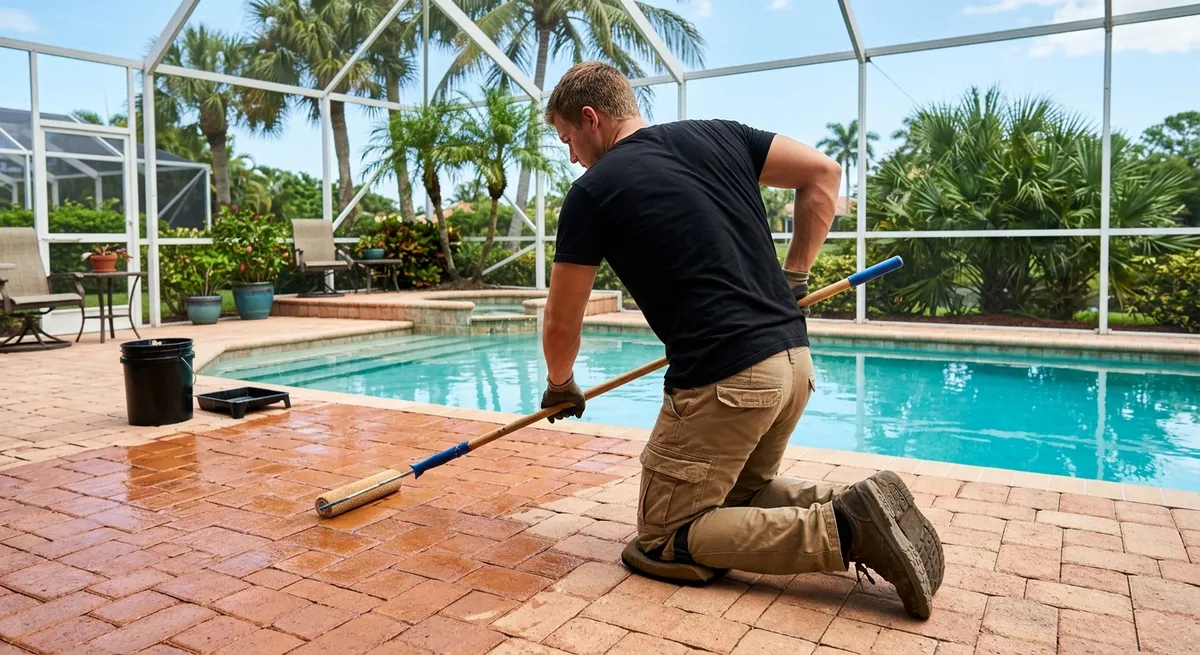
Pavers must be completely dry before sealing—typically 24-48 hours after pressure washing. Sealing damp pavers causes clouding, peeling, and premature failure.Step 4: Sealer Application
We apply sealer using professional-grade sprayers for even coverage without pooling. Two thin coats typically provide optimal protection.Step 5: Curing
Fresh sealer needs 24-48 hours to fully cure. During this time, keep foot traffic to a minimum and vehicles off the surface entirely.When to Seal Your Pavers
New Pavers
Wait at least 60-90 days before sealing new pavers. This allows:- Efflorescence (mineral deposits) to work its way out
- Pavers to fully settle
- Joint sand to compact
Existing Pavers
The best time to seal in South Florida is during our dry season—roughly November through April. This provides:- Lower humidity for faster drying
- Less chance of rain interrupting the process
- Optimal curing conditions
Re-Sealing Schedule
Most quality sealers last 3-5 years in Florida's climate. Signs it's time to reseal:- Water no longer beads on the surface
- Colors appear faded
- Weeds are returning in joints
- Stains aren't wiping up easily
DIY vs. Professional Sealing
Can you seal pavers yourself? Yes—but there are significant challenges:
DIY Challenges
- Surface prep: Without commercial pressure washing equipment, getting pavers truly clean is difficult
- Sealer selection: Choosing the wrong product leads to poor results or damage
- Application technique: Uneven application creates blotchy, unprofessional results
- Weather timing: Getting the timing right with Florida's unpredictable weather is tricky
- Quantity calculation: Too little sealer provides inadequate protection; too much causes peeling
Professional Advantages
- Commercial-grade cleaning equipment
- Expert product selection for your specific pavers
- Consistent, even application
- Warranty on materials and workmanship
- Completed in days, not weeks
Common Paver Sealing Mistakes
Mistake 1: Sealing Dirty Pavers
The sealer will lock in stains and prevent proper bonding. Always clean thoroughly first.Mistake 2: Applying Too Thick
Heavy coats look good initially but peel and flake over time. Multiple thin coats are always better.Mistake 3: Sealing Damp Pavers
Moisture trapped under sealer causes clouding (white haze) that's nearly impossible to fix without stripping.Mistake 4: Using Interior Sealers Outdoors
Interior-grade sealers lack UV protection and break down quickly in Florida's intense sun.Mistake 5: Ignoring Joint Sand
Sealing over eroded joints just delays the inevitable. Repair joints before sealing.Is Paver Sealing Worth It?
Paver sealing is one of the best investments you can make in your home's hardscaping. Properly sealed pavers look better, last longer, and require less maintenance than unsealed surfaces.
Curious what it would cost to restore your pavers? We handle the full process: pressure washing, joint sand replacement, and professional-grade sealing. Get your instant quote.